The Squirrelmail PHP8 Issue.
Posted: Tue Aug 29, 2023 4:38 pm
NOTE: The Squirrelmail PHP8 Issue, has now been fixed within EHCP Force.
You don’t need to follow this post, unless you have updated to the latest version of EHCP Force and Squirrelmail is still not working.
If you do follow this post, and you have already caried out the procedure in the topic “Increase Fail2ban security level. (Optional)” then you will have to reinstall “Squirrel Logger” using the procedure in that topic.
IMPORTANT: The Jully 2023 update for EHCP force introduced a new problem with Squirrelmail. If you run the EHCP updater for a second time the SquirrelMail fix that come with this update MAY be removed. This is very strange indeed.
It is not yet clear if future updates will kill Squirrelmail again.
To get around this, once you have SquirrelMail working, please make sure you use the update script in THIS POST when updating EHCP force.
Impact Level: LOWEST OF THE LOW
Fix Found: YES
Fix Complexity: ADVANCED
Bug Description
Squirrelmail version 1.4.22 is a very basic webmail client that is included with your server (in addition to Rouncube). It can be accessed (when working) by visiting Mail2.YourDomain.com in your web browser (replacing YourDomain.com, with your actual domain name).
Squirrelmail version 1.4.22, Is not compatible with PHP version 7 or PHP version 8, your server uses PHP version 8.
Symptom
When you go to Mail2.YourDomain.com in your web browser (replacing YourDomain.com, with your actual domain name), you get one of the following four errors.
1. A white screen just containing this error message (or similar).
Fatal error: Array and string offset access syntax with curly braces is no longer supported in /var/www/new/ehcp/webmail2/functions/strings.php on line 139
2. The Squirrelmail login screen but with errors on the page.
3. Sometimes you may get the normal login screen, but when you try to login you get a white screen just containing this error message (or similar).
Warning: session_set_cookie_params(): Cannot change session cookie parameters when session is active in /var/www/new/ehcp/webmail2/functions/global.php on line 471
4. You may just get a blank screen.
They may be others, but they all amount to the same incapability issue.
The Fix
Put in basic terms we need to upgrade Squirrelmail to fix this issue.
So lets get started!
Fist of all we need to download Squirrelmail version 1.4.23-svn, the easiest way is to us this direct download link.
https://squirrelmail.org/countdl.php?fileurl=http%3A%2F%2Fsnapshots.squirrelmail.org%2Fsquirrelmail-20230829_0200-SVN.stable.tar.gz
If you would prefer to download it from the website, here is the link.
https://squirrelmail.org/download.php
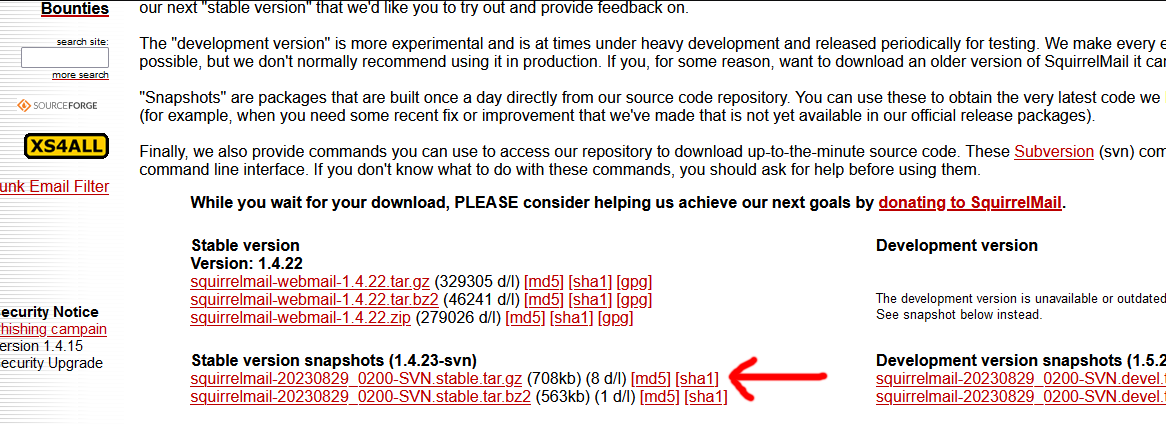
It's the squirrelmail-20230829_0200-SVN.stable.tar.gz one you need.
Ok next we need to unzip the file we just downloaded, just to make a bit more complicated it is a double archive file. In other words, a zip file within a zip file.
When the file is fully unzipped you should end up with a folder called squirrelmail.stable.
Now, all you experts out there will say, my installation method is the hard way. However, this method will help you get to grips more with WinSCP.
Logon to your server using your PC and PuTTY and the issue this command.
sudo chmod -R 777 /var/www/new/ehcp/webmail2
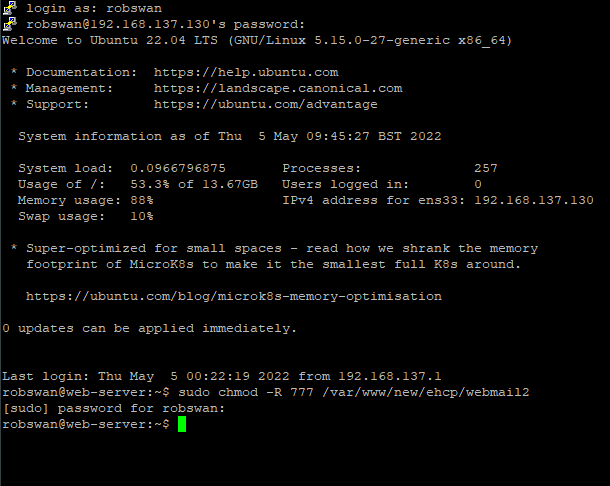
The above will the grant permission for us to edit this folder using WinSCP.
Just in case anything goes wrong, we are going to create a backup folder for the old version of Squirrelmail.
Issue this command to create this folder.
sudo mkdir -m 777 /var/www/new/ehcp/SMailOld
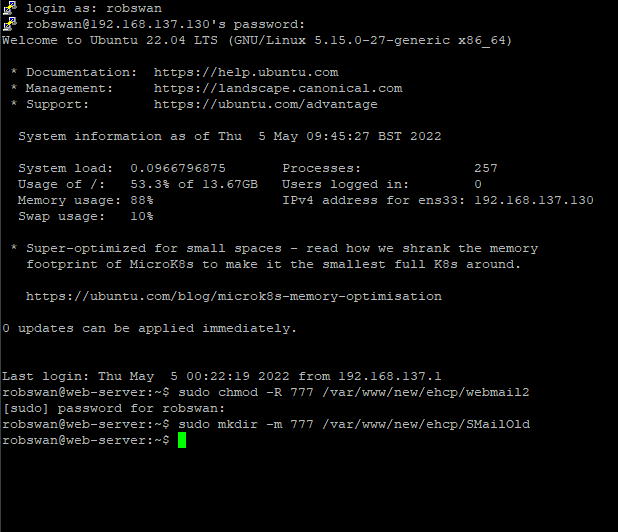
Ok, connect to your server using WinSCP (leave PuTTY open)
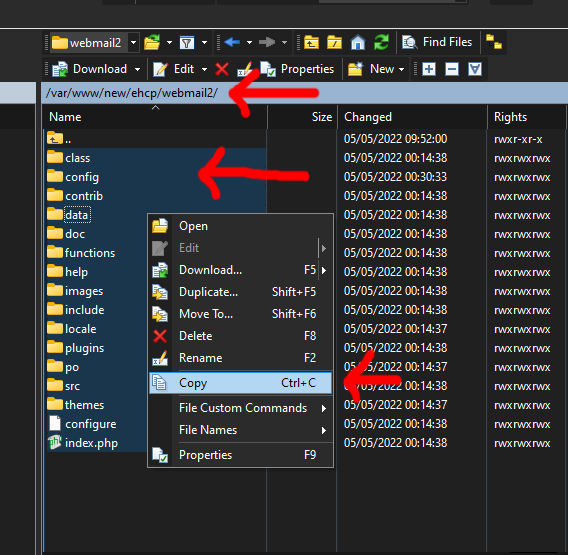
Within WinSCP, navigate to folder /var/www/new/ehcp/webmail2.
Click on the first folder (within WinSCP) to highlight it, then press CTRL + A, to select all.
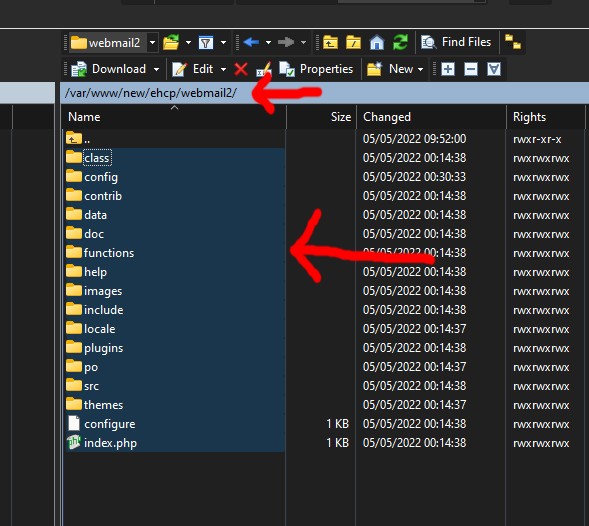
Right click on the selection and select Copy.
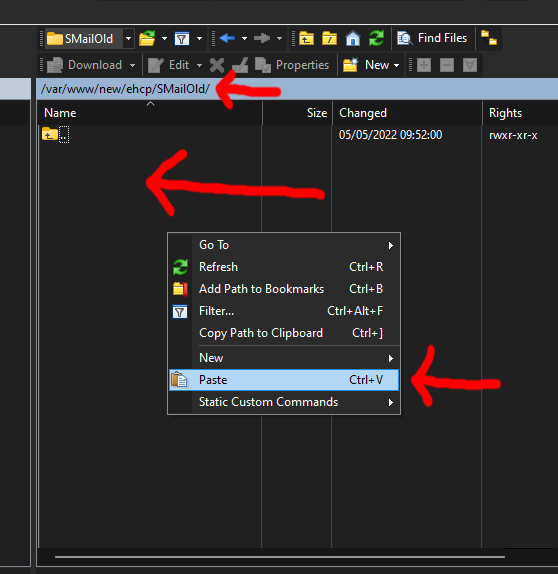
Next (within WinSCP), navigate to this folder /var/www/new/ehcp/SMailOld
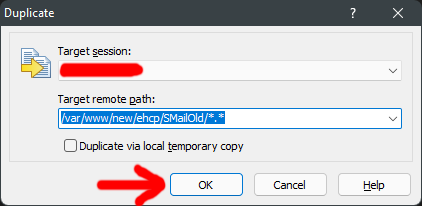
Right click within the empty space in the folder and select Paste.
Click ok.
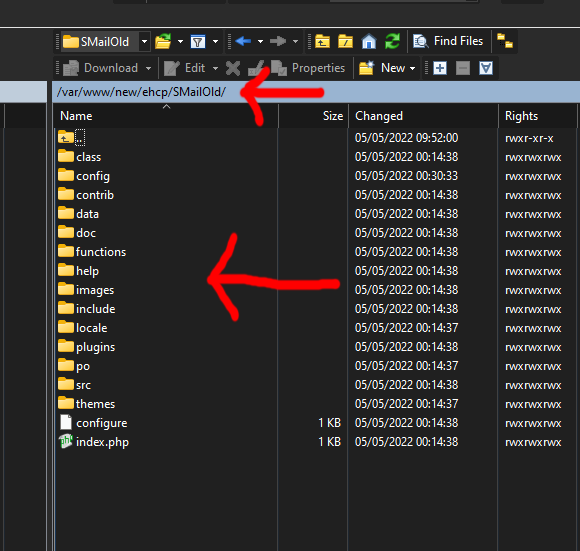
Ok, we have now made a backup copy of our original installation of Squirrelmail.
Next we need to delete the old installation, so navigate back to /var/www/new/ehcp/webmail2.
Click on the first folder (within WinSCP) to highlight it, then press CTRL + A, to select all.
Double check we are in the folder /var/www/new/ehcp/webmail2, as we don’t want to delete the wrong files.
Right click on the selection, then select Delete.
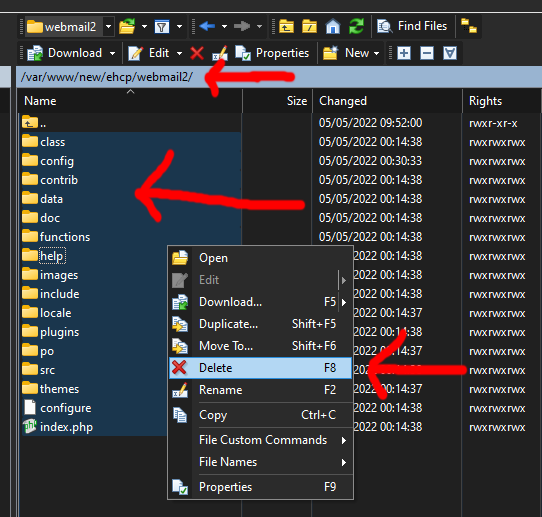
Click OK to confirm the file deletion.

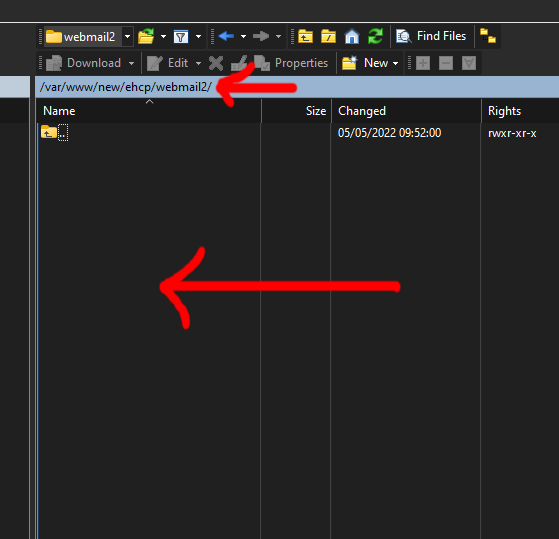
So, just to recap, we have made a backup copy of the old Squirrelmail and then cleaned out the folder ready for the new version.
Ok next just on your PC, open the folder squirrelmail.stable (the one we downloaded and unzipped).
Within that folder there should be another folder called Squirrelmail, please open that one.
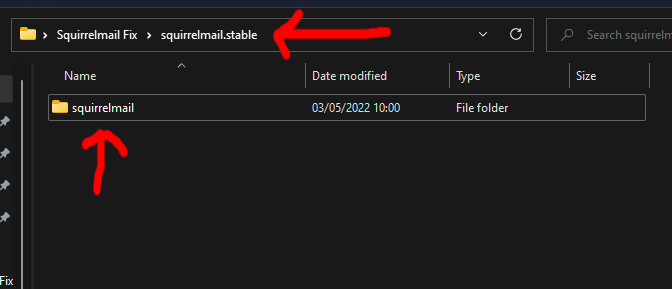
Again, just using your PC, click on the first folder to select it and press CTRL + A to select all.
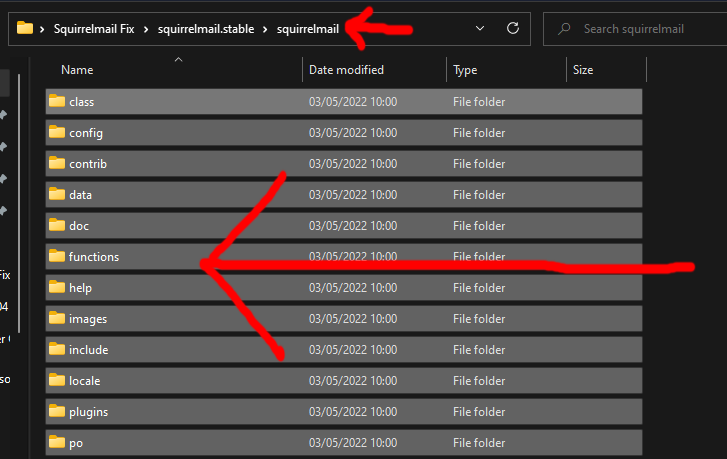
Right click on the selection and select Copy (remember this is just within Windows).
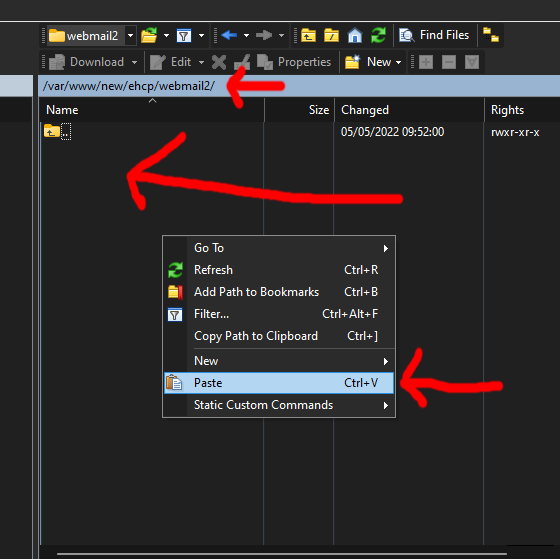
Next go back to WinSCP, making sure you are still in the folder /var/www/new/ehcp/webmail2, right click on the open space and click Paste.
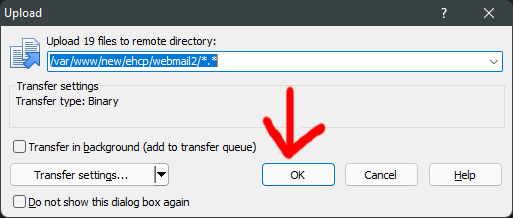
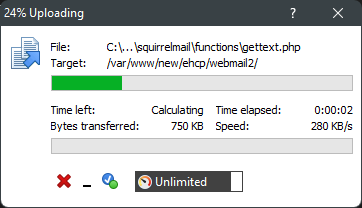
Click OK to confirm the file upload.
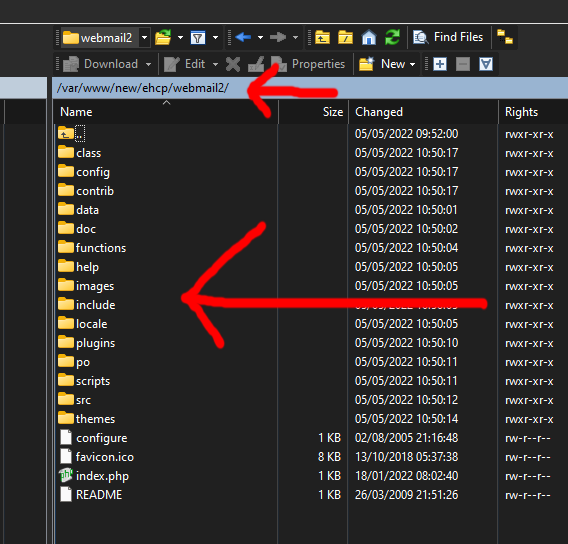
Ok, that the hardest bit done, if you are good with copy and paste then even that was not so tricky.
So, now we have the new version of Squirrelmail on our server, next we need to configure it.
So going back to PuTTY issue this command.
sudo chmod -R 777 /var/www/new/ehcp/webmail2/config
Then this one.
sudo chmod -R 777 /var/www/new/ehcp/webmail2/data
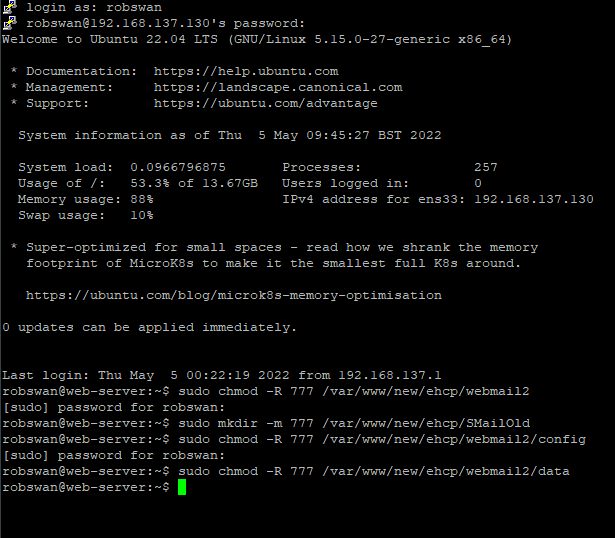
Next, in PuTTY issue this command.
sudo perl /var/www/new/ehcp/webmail2/config/conf.pl
The Squirrelmail configuration application should now load within PuTTY.
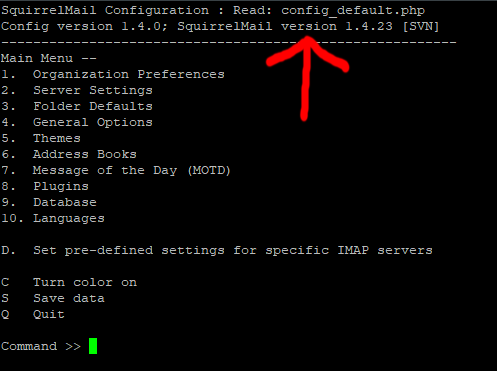
The Application should be reporting Squirrelmail version 1.4.23 [SVN].
Ok, so fist of we need to set some folder locations.
Please type 4 and press enter (General Options)
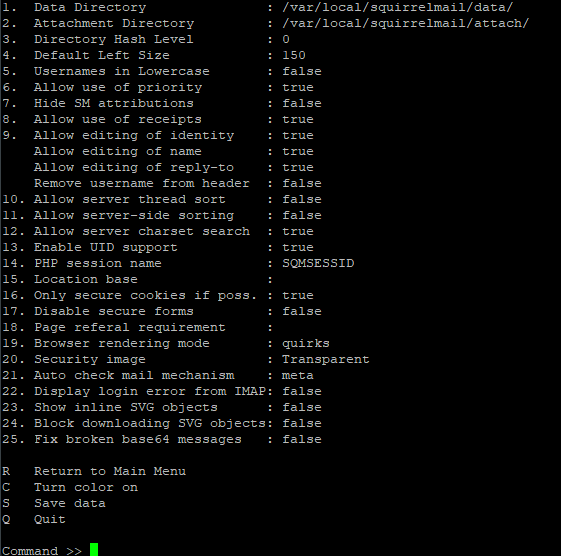
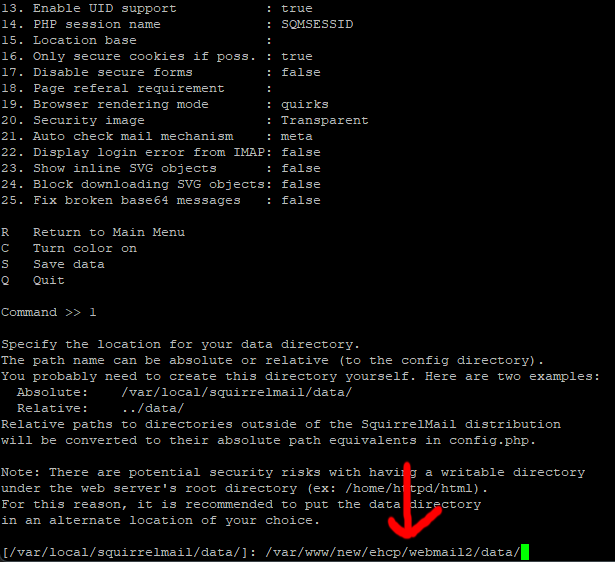
We need to enter 1 (Data Directory option).
Paste in this directory (press enter).
/var/www/new/ehcp/webmail2/data/
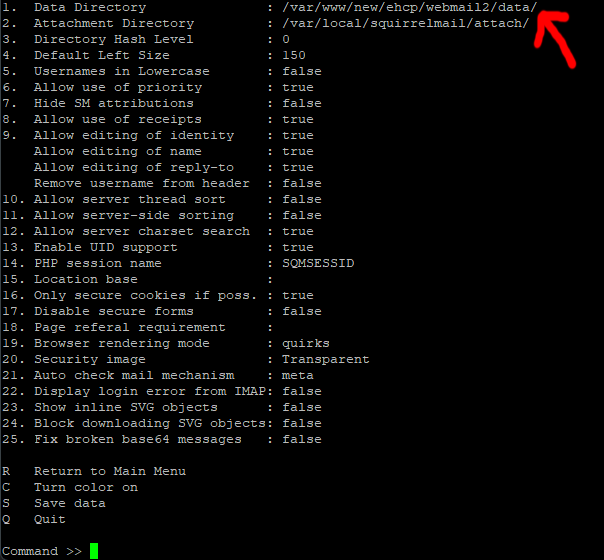
Next its option 2 (Attachment Directory) so type 2 and enter.
Then paste in this directory (press enter).
/var/www/new/ehcp/webmail2/data/
Yes, it is the same as the first one!
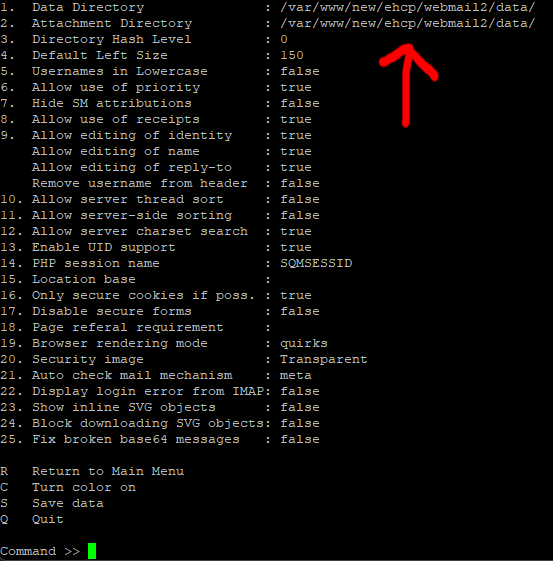
Next type s (enter) to save these changes.
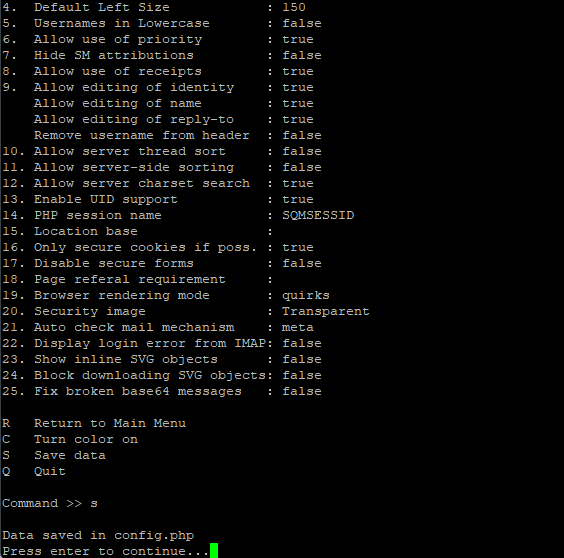
When prompted press enter to continue.
Next type r (Return to Main Menu) and press enter.
Ok, type 1 (Organization Preferences)
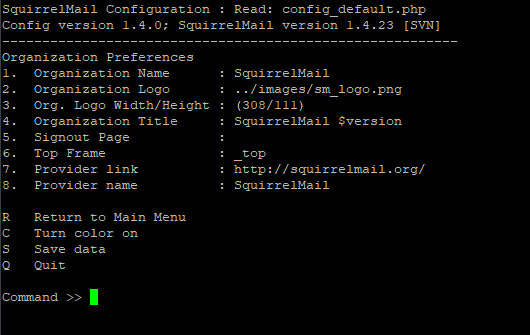
Next (using the same methods we used in the folder changes) change the following.
Option 1 (Organization Name) to Easy Hosting Control Panel Webmail
Option 4 (Organization Title) to Easy Hosting Control Panel - Webmail – Squirrelmail
Option 7 (Provider link) to http://www.ehcpforce.tk
Option 8 (Provider name) to Easy Hosting Control Panel
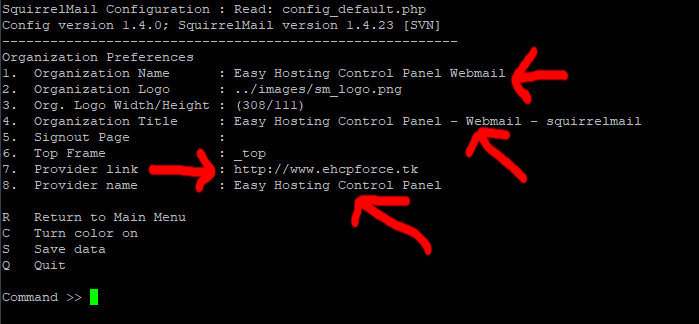
Next, as before type s (enter) to save the changes.
Next type q (enter) to quit the application.
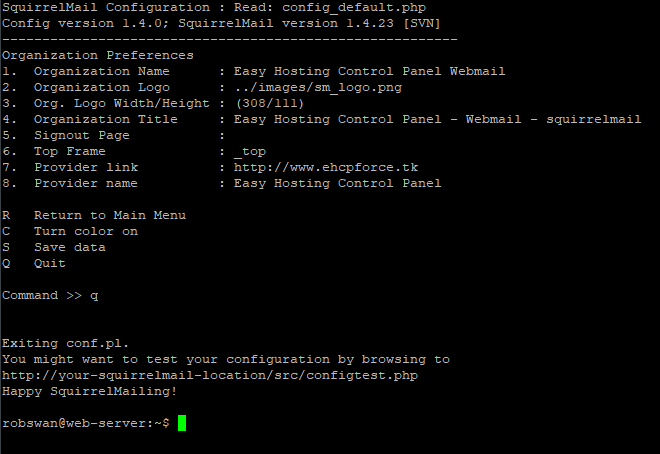
Ok leaving PuTTY open for now, open your web browser and navigate to.
Mail2.YourDomain.com in your web browser (replacing YourDomain.com, with your actual domain name)
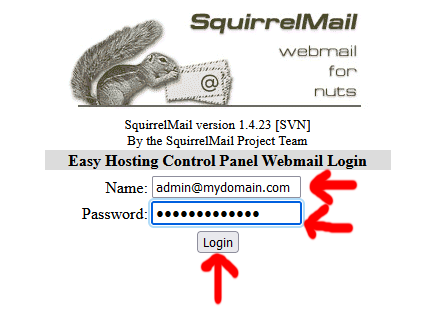
Obviously use your own server email address and password!

Remember Squirrelmail is a very basic application, have a quick play around to make sure it is working ok, then sign out again.
We have now fixed, Squirrelmail.
Assuming, everything is ok its now safe to delete the backup we made (of the old Squirrelmail) so go back to PuTTY.
Issue this command.
sudo rm -rf /var/www/new/ehcp/SMailOld
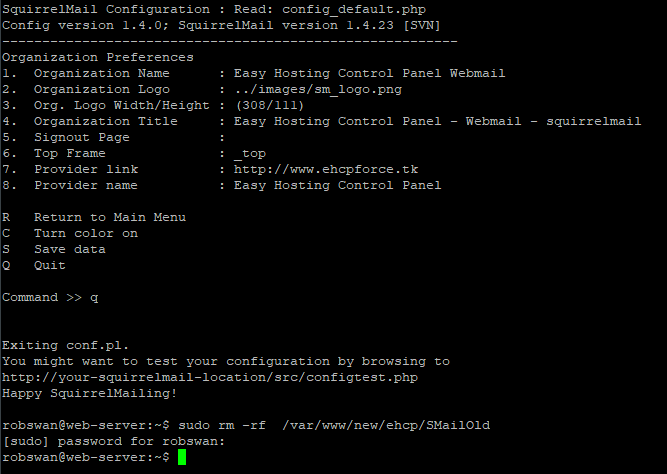
You can now close PuTTY (type exit, then press enter), WinSCP and anything else server related you had open.
IMPORTANT INFORMATION REGARDING EHCP FORCE UPDATE
When it comes to updating your EHCP force installation, Please DO NOT use the update script from the EHCP force website as this will undo the Squirrelmail upgrade.
You must use the upgrade script provided within THIS POST to update EHCP force.
We are all done here.
You don’t need to follow this post, unless you have updated to the latest version of EHCP Force and Squirrelmail is still not working.
If you do follow this post, and you have already caried out the procedure in the topic “Increase Fail2ban security level. (Optional)” then you will have to reinstall “Squirrel Logger” using the procedure in that topic.
IMPORTANT: The Jully 2023 update for EHCP force introduced a new problem with Squirrelmail. If you run the EHCP updater for a second time the SquirrelMail fix that come with this update MAY be removed. This is very strange indeed.
It is not yet clear if future updates will kill Squirrelmail again.
To get around this, once you have SquirrelMail working, please make sure you use the update script in THIS POST when updating EHCP force.
Impact Level: LOWEST OF THE LOW
Fix Found: YES
Fix Complexity: ADVANCED
Bug Description
Squirrelmail version 1.4.22 is a very basic webmail client that is included with your server (in addition to Rouncube). It can be accessed (when working) by visiting Mail2.YourDomain.com in your web browser (replacing YourDomain.com, with your actual domain name).
Squirrelmail version 1.4.22, Is not compatible with PHP version 7 or PHP version 8, your server uses PHP version 8.
Symptom
When you go to Mail2.YourDomain.com in your web browser (replacing YourDomain.com, with your actual domain name), you get one of the following four errors.
1. A white screen just containing this error message (or similar).
Fatal error: Array and string offset access syntax with curly braces is no longer supported in /var/www/new/ehcp/webmail2/functions/strings.php on line 139
2. The Squirrelmail login screen but with errors on the page.
3. Sometimes you may get the normal login screen, but when you try to login you get a white screen just containing this error message (or similar).
Warning: session_set_cookie_params(): Cannot change session cookie parameters when session is active in /var/www/new/ehcp/webmail2/functions/global.php on line 471
4. You may just get a blank screen.
They may be others, but they all amount to the same incapability issue.
The Fix
Put in basic terms we need to upgrade Squirrelmail to fix this issue.
So lets get started!
Fist of all we need to download Squirrelmail version 1.4.23-svn, the easiest way is to us this direct download link.
https://squirrelmail.org/countdl.php?fileurl=http%3A%2F%2Fsnapshots.squirrelmail.org%2Fsquirrelmail-20230829_0200-SVN.stable.tar.gz
If you would prefer to download it from the website, here is the link.
https://squirrelmail.org/download.php

It's the squirrelmail-20230829_0200-SVN.stable.tar.gz one you need.
Ok next we need to unzip the file we just downloaded, just to make a bit more complicated it is a double archive file. In other words, a zip file within a zip file.
When the file is fully unzipped you should end up with a folder called squirrelmail.stable.
Now, all you experts out there will say, my installation method is the hard way. However, this method will help you get to grips more with WinSCP.
Logon to your server using your PC and PuTTY and the issue this command.
sudo chmod -R 777 /var/www/new/ehcp/webmail2

The above will the grant permission for us to edit this folder using WinSCP.
Just in case anything goes wrong, we are going to create a backup folder for the old version of Squirrelmail.
Issue this command to create this folder.
sudo mkdir -m 777 /var/www/new/ehcp/SMailOld

Ok, connect to your server using WinSCP (leave PuTTY open)
Within WinSCP, navigate to folder /var/www/new/ehcp/webmail2.
Click on the first folder (within WinSCP) to highlight it, then press CTRL + A, to select all.

Right click on the selection and select Copy.

Next (within WinSCP), navigate to this folder /var/www/new/ehcp/SMailOld
Right click within the empty space in the folder and select Paste.

Click ok.


Ok, we have now made a backup copy of our original installation of Squirrelmail.
Next we need to delete the old installation, so navigate back to /var/www/new/ehcp/webmail2.
Click on the first folder (within WinSCP) to highlight it, then press CTRL + A, to select all.
Double check we are in the folder /var/www/new/ehcp/webmail2, as we don’t want to delete the wrong files.
Right click on the selection, then select Delete.

Click OK to confirm the file deletion.


So, just to recap, we have made a backup copy of the old Squirrelmail and then cleaned out the folder ready for the new version.
Ok next just on your PC, open the folder squirrelmail.stable (the one we downloaded and unzipped).
Within that folder there should be another folder called Squirrelmail, please open that one.

Again, just using your PC, click on the first folder to select it and press CTRL + A to select all.

Right click on the selection and select Copy (remember this is just within Windows).
Next go back to WinSCP, making sure you are still in the folder /var/www/new/ehcp/webmail2, right click on the open space and click Paste.

Click OK to confirm the file upload.


Ok, that the hardest bit done, if you are good with copy and paste then even that was not so tricky.
So, now we have the new version of Squirrelmail on our server, next we need to configure it.
So going back to PuTTY issue this command.
sudo chmod -R 777 /var/www/new/ehcp/webmail2/config
Then this one.
sudo chmod -R 777 /var/www/new/ehcp/webmail2/data

Next, in PuTTY issue this command.
sudo perl /var/www/new/ehcp/webmail2/config/conf.pl
The Squirrelmail configuration application should now load within PuTTY.

The Application should be reporting Squirrelmail version 1.4.23 [SVN].
Ok, so fist of we need to set some folder locations.
Please type 4 and press enter (General Options)

We need to enter 1 (Data Directory option).
Paste in this directory (press enter).
/var/www/new/ehcp/webmail2/data/


Next its option 2 (Attachment Directory) so type 2 and enter.
Then paste in this directory (press enter).
/var/www/new/ehcp/webmail2/data/
Yes, it is the same as the first one!

Next type s (enter) to save these changes.

When prompted press enter to continue.
Next type r (Return to Main Menu) and press enter.
Ok, type 1 (Organization Preferences)

Next (using the same methods we used in the folder changes) change the following.
Option 1 (Organization Name) to Easy Hosting Control Panel Webmail
Option 4 (Organization Title) to Easy Hosting Control Panel - Webmail – Squirrelmail
Option 7 (Provider link) to http://www.ehcpforce.tk
Option 8 (Provider name) to Easy Hosting Control Panel

Next, as before type s (enter) to save the changes.
Next type q (enter) to quit the application.

Ok leaving PuTTY open for now, open your web browser and navigate to.
Mail2.YourDomain.com in your web browser (replacing YourDomain.com, with your actual domain name)

Obviously use your own server email address and password!

Remember Squirrelmail is a very basic application, have a quick play around to make sure it is working ok, then sign out again.
We have now fixed, Squirrelmail.
Assuming, everything is ok its now safe to delete the backup we made (of the old Squirrelmail) so go back to PuTTY.
Issue this command.
sudo rm -rf /var/www/new/ehcp/SMailOld

You can now close PuTTY (type exit, then press enter), WinSCP and anything else server related you had open.
IMPORTANT INFORMATION REGARDING EHCP FORCE UPDATE
When it comes to updating your EHCP force installation, Please DO NOT use the update script from the EHCP force website as this will undo the Squirrelmail upgrade.
You must use the upgrade script provided within THIS POST to update EHCP force.
We are all done here.